Advanced Topics
Here you'll find guides on various topics:
- Database setup for your own PostgreSQL server
- How to create backups
- Restore data from your backups
- Reset user passwords, transfer ownerships, ...
- How to use custom CA Certificates
- HTTPS Reverse Proxy SSL/HTTPS Configuration
- Migrating your data from Testiny Cloud
Database Setup (for your own PostgreSQL server)
Testiny Server supports PostgreSQL version 14, 15 and 16.
As described in the introduction, Testiny Server creates the needed databases during setup if the user has sufficient permissions. However, you can also initialize the database yourself.
Three databases are needed:
central- containing user informationtenant_main- containing data (tests, runs, ...) of the main organizationtenant_testing- containing data of the test organization (to use as a playground)
Also make sure, that the following configuration is set:
- set ENCODING to
UTF8(default value for PostgreSQL) - set TABLESPACE to
pg_default(default value for PostgreSQL) - If you use replication in your PostgreSQL database, set
synchronous_committoremote_apply. - Collation can be configured freely, as long as it's compatible with UTF8 encoding.
- set
autovacuum_analyze_scale_factorto 0 or, in most cases, <0.01 might be sufficent for on-premise installation
Please note that the optimization parameters may vary depending on your system resources and expected performance requirements. Please ensure that your database is correctly configured and follows best practices for tuning and maintenance.
Example for database initialization
Here's an example script how to create the databases for PostgreSQL:
CREATE ROLE testiny LOGIN PASSWORD 'changeme'; /* make sure to set a custom password here or change it after */


CREATE DATABASE central WITH
  OWNER = 'testiny'
  ENCODING = 'UTF8'
  TABLESPACE = pg_default
  CONNECTION LIMIT = -1; /* restrict if required, should be 2 * PG_MAX_POOL */

ALTER DATABASE central SET synchronous_commit=remote_apply;
REVOKE CONNECT ON DATABASE central FROM PUBLIC;


CREATE DATABASE tenant_main WITH
  OWNER = 'testiny'
  ENCODING = 'UTF8'
  TABLESPACE = pg_default
  CONNECTION LIMIT = -1; /* restrict if required, should be 2 * PG_MAX_POOL */

ALTER DATABASE tenant_main SET synchronous_commit=remote_apply;
REVOKE CONNECT ON DATABASE tenant_main FROM PUBLIC;


CREATE DATABASE tenant_testing WITH
  OWNER = 'testiny'
  ENCODING = 'UTF8'
  TABLESPACE = pg_default
  CONNECTION LIMIT = -1; /* restrict if required, should be 2 * PG_MAX_POOL */

ALTER DATABASE tenant_testing SET synchronous_commit=remote_apply;
REVOKE CONNECT ON DATABASE tenant_testing FROM PUBLIC;
Create Backups
With Testiny Server, you are solely responsible for creating backups of your Testiny databases and BLOBs.
There are two ways to create backups:
- Create a complete backup using the Testiny API
Backup your databases, files, blobs etc. with the Testiny API to a single compressed and encrypted file. - Using native tools:
- Backup the docker storage volume (includes BLOBs and SQLite database files).
- Backup the PostgreSQL database
Create a complete backup via the API
Testiny Server provides API routes to easily create backups:
SERVER_URL/api/v1/standalone/backup/centralto create backups containing all central data (for example user accounts)SERVER_URL/api/v1/standalone/backup/mainto create backups of your main instance containing test cases, runs, BLOBs, etc.
For the API request, you need to provide the backup export token you received during setup in the header x-export-token.
The tenant testing is not included in the backup created by these API requests as it is intended to be a sandbox tenant and it should not include any production data.
Here is an example of how to create encrypted backups using curl for the central and main database. Replace SERVER_URL with your Testiny Server URL and YOUR_EXPORT_TOKEN with the value of the backup export token you received during the setup:
- Central
- Main
curl "SERVER_URL/api/v1/standalone/backup/central" -H "x-export-token: YOUR_EXPORT_TOKEN" --output central.zip.wfenc
curl "SERVER_URL/api/v1/standalone/backup/main" -H "x-export-token: YOUR_EXPORT_TOKEN" --output tenant_main.zip.wfenc
The created backups (central.zip.wfenc and tenant_main.zip.wfenc) are encrypted and if needed, you can decrypt the backups with the private key and keyphrase you received during setup. Please contact us if you want to directly decrypt the backups.
Create native backups
Backup your Testiny PostgreSQL database
Testiny Server creates three databases in your PostgreSQL database:
central- containing user informationtenant_main- containing data (tests, runs, ...) of the main organizationtenant_testing- containing data of the test organization (to use as a playground)
Please refer to PostgreSQL's documentation on creating backups and restoring databases.
Important: Don't forget to backup the BLOBs (images, screenshots, attached files, ...) from the storage volume.
Backup your files and BLOBs
BLOBs (images, screenshots, files, ...) are stored in the storage volume of the Testiny Server docker container.
When creating backups for Testiny Server, please create a backup of all data in the storage volume.
Please refer to Docker's (and SQLite's) documentation on creating backups and restoring the data in the storage volume.
Backup your SQLite database
If you use SQLite as your database, the database files are also stored in the storage volume. In the process of creating a backup of your files and blobs, the SQLite database is also backed up.
Restore your data from a Backup
Restore the full Testiny Server
Restoring backups is a DESTRUCTIVE OPERATION AND WILL DROP EXISTING DATABASES.
Testiny Server provides a CLI that can be used to restore the central and tenant databases.
Copy the (encrypted) backup files and the .pem key file to the Docker container.
Connect to the Docker container running Testiny Server and start a shell (e.g. with docker exec -it CONTAINER /bin/bash).
Have your private key passphrase ready that you received during setup, as you'll need it during the restore process to decrypt the backup files.
To restore the central database run the following command:
node standalone.js --restoreKey <PEM KEY FILE> --restoreCentral <CENTRAL .wfenc FILE>
To restore the main tenant database run the following command:
node standalone.js --restoreKey <PEM KEY FILE> --restoreTenants <MAIN TENANT .wfenc FILE>
Please note, that for restoring tenants the backup file must be named exactly like the organization name. For tenant "main", the backup file must be named "tenant_main.wfenc".
Use --noKey to restore unencrypted backups.
Use --confirmRestore and set TESTINY_IMPORTKEY_PASSPHRASE for non-interactive restore without prompts.
You can see all available CLI options by running node standalone.js --help.
When restoring data to a fresh Testiny Server instance, you must delete the file SECRETS_DELETE_ME.txt from the storage volume. Otherwise, the instance will suggest to setup a new organization instead of using the restored one.
Restore a tenant
If you only want to restore a tenant (and keep the central database as it is), you can also only restore the tenant database e.g. "tenant_main" database.
Note: Tenants need to exist in the central database before they can be restored.
Testiny Server CLI
Testiny Server provides a CLI that can be used to restore databases, reset passwords and set a new owner.
Connect to the Docker container running Testiny Server and start a shell (e.g. with docker exec -it CONTAINER /bin/bash).
Run the CLI with node standalone.js --help to see all available options.
Reset User Passwords
You can reset a user's password by running:
node standalone.js --resetUser <email>
The newly generated password is printed to the console.
Alternatively, you can also reset user passwords in the app in Settings > User Management > "..." > "Reset password".
Set the Testiny Server Owner
To set the owner of the organization with the Testiny Server CLI use:
node standalone.js --setOwner <email>
The given user will be the new owner.
Alternatively, you can also transfer ownership in the app in Settings > Organization > "Transfer ownership".
Use Custom (CA) Certificates
If you want to use custom (CA) certificates, place your custom CA certificates into the file storage/extra-ca-certificates.pem. After adding your certificates, you need to restart the Docker container with docker restart <container-name> to apply the changes.
Starting from version v1.18.0, the file is automatically created and the env variable NODE_EXTRA_CA_CERTS is set tostorage/extra-ca-certificates.pem by default. Before v1.18.0, you'll need to create the file yourself and set the env variable NODE_EXTRA_CA_CERTS to the file.
How to combine various certificates into a single .pem
In case you need to provide multiple certificates to Testiny Server, simply combine them into one file.
To do this use any kind of text editor of your choice (Notepad++, VSCode, Vi, ...). Copy the content of the individual certificate files one after the other into the file storage/extra-ca-certificates.pem as shown below:
(the order does not matter)
-----BEGIN CERTIFICATE-----
      (primary certificate: server.crt)
-----END CERTIFICATE-----

-----BEGIN CERTIFICATE-----
      (intermediate certificate: intermediate.crt)
-----END CERTIFICATE-----

-----BEGIN CERTIFICATE-----
      (root certificate: root.crt)
-----END CERTIFICATE-----
HTTPS
Testiny Server does not provide HTTPS. You need to set up your own HTTPS reverse proxy/gateway.
This is an exemplary SSL termination config using Nginx as a reverse proxy in front of Testiny Server.
Please replace the <ADD_..._HERE> sections with the respective values.
server {
    listen 443 ssl;
    listen [::]:443 ssl;
    http2  on;

    server_name <ADD_SERVER_NAME_HERE>;
    root /var/www/html;
    index index.html index.htm;

    # SSL config
    add_header Strict-Transport-Security "max-age=63072000; includeSubDomains;" always;
    ssl_certificate         /<ADD_PATH_TO_SSL_CERTS_HERE>/fullchain.pem;
    ssl_certificate_key     /<ADD_PATH_TO_SSL_CERTS_HERE>/privkey.pem;
    ssl_trusted_certificate /<ADD_PATH_TO_SSL_CERTS_HERE>/fullchain.pem;

    ssl_ciphers ECDHE-ECDSA-AES128-GCM-SHA256:ECDHE-RSA-AES128-GCM-SHA256:ECDHE-ECDSA-AES256-GCM-SHA384:ECDHE-RSA-AES256-GCM-SHA384:ECDHE-ECDSA-CHACHA20-POLY1305:ECDHE-RSA-CHACHA20-POLY1305:DHE-RSA-AES128-GCM-SHA256:DHE-RSA-AES256-GCM-SHA384;
    ssl_prefer_server_ciphers off;
    ssl_protocols TLSv1.2 TLSv1.3;
    ssl_ecdh_curve X25519:prime256v1:secp384r1;
    ssl_stapling on;
    ssl_stapling_verify on;
    ssl_session_timeout 1d;
    ssl_session_cache shared:MozSSL:10m;
    ssl_session_tickets off;

    # When using Diffie-Hellman parameters (DH-params), please don't forget to create them first!
    # ssl_dhparam /etc/nginx/dhparams.pem;

    location / {
      sendfile on;
      send_timeout 150;
      client_max_body_size 1G;
      client_body_buffer_size 128k;

      proxy_redirect off;
      proxy_connect_timeout 150;
      proxy_send_timeout 150;
      proxy_read_timeout 150;

      proxy_headers_hash_max_size 512;
      proxy_headers_hash_bucket_size 128;

      proxy_http_version 1.1;
      proxy_set_header Upgrade $http_upgrade;
      proxy_set_header Connection "upgrade";

      proxy_set_header Host $host;
      proxy_set_header X-Real-IP $remote_addr;
      proxy_set_header X-Forwarded-For $remote_addr;
      proxy_set_header X-Forwarded-For $proxy_add_x_forwarded_for;
      proxy_set_header X-Forwarded-Host $host;
      proxy_set_header X-Forwarded-Proto $scheme;

      proxy_pass http://<ADD_TESTINY_SERVER_IP:PORT_HERE>$request_uri;
      # example:
      # proxy_pass http://127.0.0.1:7700$request_uri;
    }
}
Configuring your Mail Server
Configure your SMTP mail server with the environment variables SMTP_HOST, SMTP_PORT, SMTP_USER, SMTP_PASSWORD, … .
Set the sender mail address with TESTINY_MAIL_FROM.
See all optional environment variables for configuration.
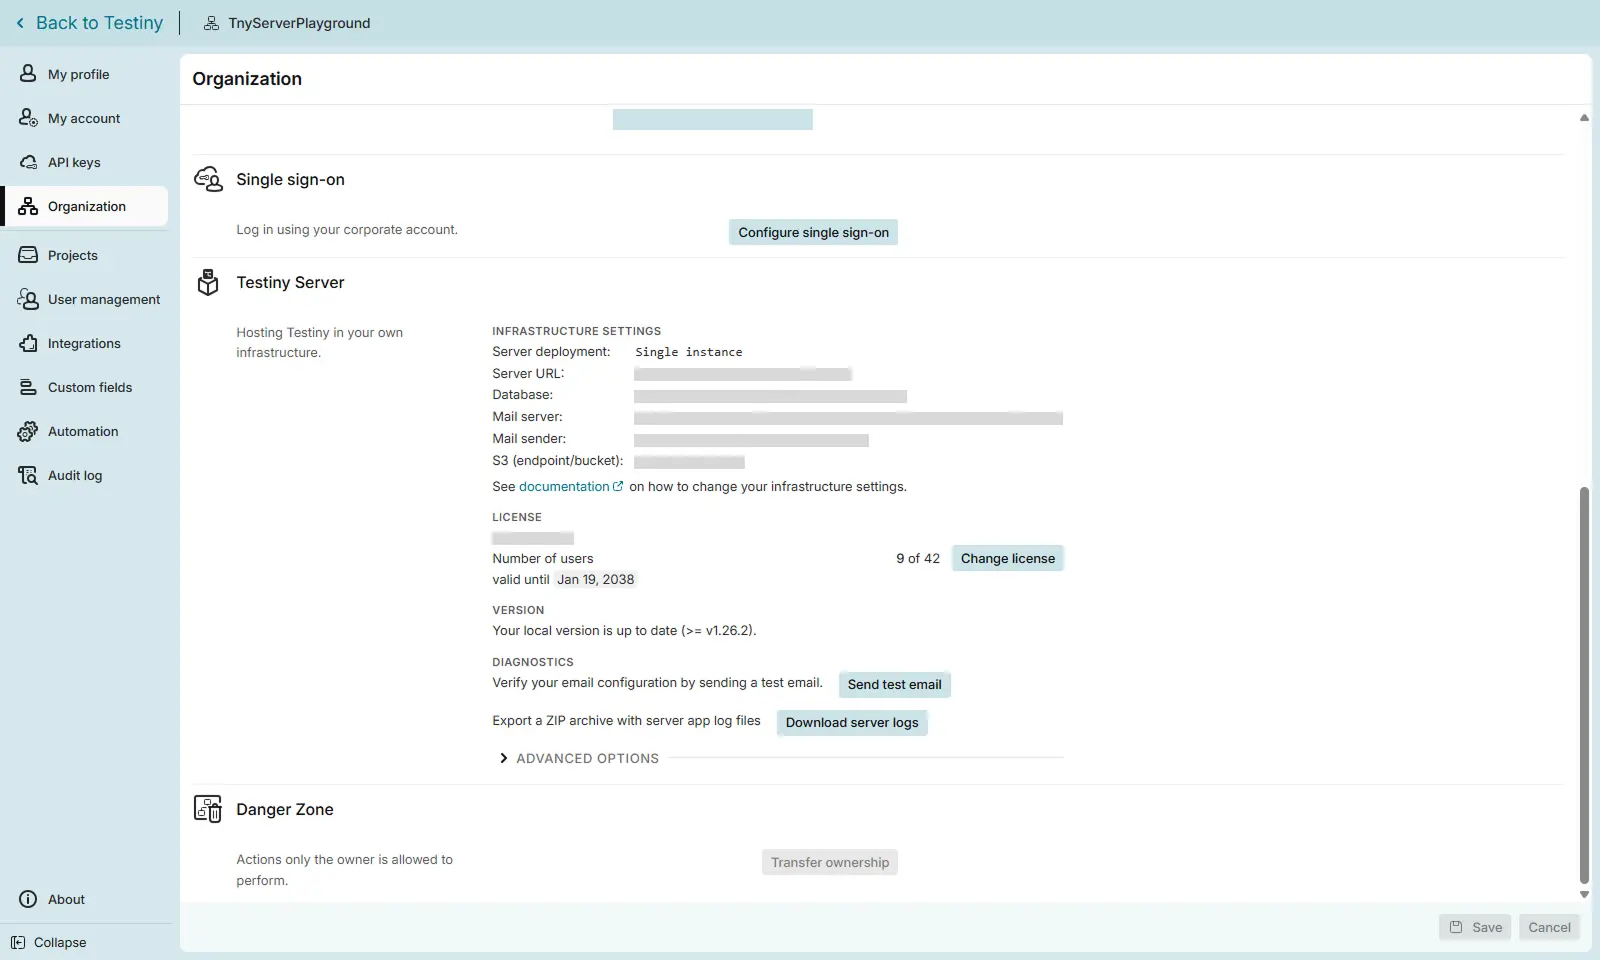
In the app in Settings -> Organization in section Testiny Server, you can send a test email to verify your mail server configuration.
Setting up S3 Storage
-
If you're currently using Testiny Server with file storage (
BLOBSTORAGE_FILEis set toprimaryby default), setBLOBSTORAGE_FILEtofallbackto read old blobs from file storage.
If you're configuring a fresh instance, you can also set it todisabled. -
To enable S3 blob storage, set
BLOBSTORAGE_S3toprimary.
Also set following environment variables:BLOBSTORAGE_S3_ENDPOINT- S3 endpoint URL e.g.https://my-s3-service.corp.internal/BLOBSTORAGE_S3_REGION- S3 region (can be empty)BLOBSTORAGE_S3_BUCKET- name of the bucket to use (Note that some storage systems require the bucket to be also specified in the endpoint URL.)BLOBSTORAGE_S3_ACCESSKEY- access key for the S3 bucketBLOBSTORAGE_S3_SECRET- secret for the S3 bucket- (optional)
BLOBSTORAGE_S3_ENCRYPTION_KEY- an optional encryption key for SSE-C encryption (with AES256), 32 bytes hex, defaults tooff- DATA IS UNRECOVERABLE IF KEY IS LOST!
Please note that the S3 service currently only supports direct connections (no proxy connections).
If a custom CA or self-signed certificate is used, custom CA certs also need to be configured.
Common pitfalls
-
If your S3 storage provider uses path style buckets instead of host name labels (e.g. s3-storage.internal/bucket vs bucket.s3-storage.internal), please set
BLOBSTORAGE_S3_USEPATHSTYLEtotrue. -
If you receive an internal S3 error that is a
SignatureDoesNotMatcherror (check server logs for error message) and your other settings (region, secret, key, ...) are valid and correct, you may need to setBLOBSTORAGE_S3_REQUEST_CHECKSUMtofalse.
For versions of Testiny Server prior to v1.33.0, use the setting AWS_REQUEST_CHECKSUM_CALCULATION=when_required instead.
Migrate from Testiny Cloud to Testiny Server
Testiny offers a seamless migration of an existing Testiny Cloud account to Testiny Server.
For the migration, you need to use the same Testiny Server version as your cloud organization is running on. This is usually the latest available version, i.e. server:latest in the Testiny Server repository.
We recommend switching to server:stable on a later upgrade.
Execute the Setup up to Step 3. Then request your cloud data backup in the "Migrate from cloud" tab. We'll provide you with an encrypted export bundle, which you can import into your Testiny Server instance.
Import the received data and provide a new password for the owner. Optionally you can also change the owner's email.
Please be aware that sensitive data will be deleted during the migration process:
- All passwords from users have been randomized, please either:
- Reset the passwords for your users in Settings > User Management > "..." > "Reset password" or use the Testiny Server CLI to reset passwords
- Let the users reset their password themselves ("Forgot your password?" on the login page)
- All Integration Secrets (e.g. for Jira) and SSO Secrets have been purged; please reconfigure your existing Integrations and SSO-Provider.
- API-Keys need to be reissued
Jira Data Center/Server with Testiny Server
To set up the add-on for Jira Data Center with Testiny Server, simply install the Jira marketplace app and configure it for your Testiny Server instance. See the Jira Data Center/Server documentation for detailed instructions.
Jira Cloud with Testiny Server
The Jira Cloud Add-On is currently not available for new installations or configurations with Testiny Server, as Atlassian does not provide User-Defined Remotes for Forge Apps yet. Previously configured Jira Cloud Add-Ons will continue to work with Testiny Server.
Testiny Server is configured using environment variables that need to be passed to the Docker container. To set up the connection from Jira Cloud to Testiny Server, you'll need to set the following environment variables for Testiny Server:
ENABLE_JIRA_CLOUDto trueJIRA_CONNECT_META_KEYto a unique alphanumeric key, e.g. a1b2c3d4e5f6
Testiny Server will create a manifest file with that key at https://<SERVER_URL>/api/v1/jira-integration/connect-server/<JIRA_CONNECT_META_KEY>. This manifest file is used to install the add-on in Jira Cloud:
- In Jira, navigate to "Apps" and "Manage apps"
- Click "Upload app"
- Enter the URL of the manifest file ("app descriptor URL") (e.g.
https://testiny.mycompany.org/api/v1/jira-integration/connect-server/a1b2c3d4e5f6) - Click "Upload" to install the app
The configuration of the add-on is then the same as for Testiny Cloud. See the documentation for configuring the add-on.
Cluster Deployments with Testiny Server
Testiny Server can be deployed on cluster platforms like Kubernetes and OpenShift for greater flexibility and scalability. To obtain the cluster-mode compatible image, please contact our support team.
Troubleshooting & FAQs
Downloading Server Logs
In the organization settings, go to section Testiny Server and click "Download server logs" to export all log files:
FAQs
I receive 'API_INTERNAL_ERROR canceling statement due to statement timeout' errors.
Please make sure that you've correctly configured and optimized your database configuration. If you haven't done so far, please try to set autovacuum_analyze_scale_factor to 0. Additionally, please try set autovacuum_vacuum_scale_factor to a smaller value than the default and check if your performance issues have been resolved.
I receive a 'Server setup incorrect - Please make sure that your Testiny Server 'SERVER_URL' is configured correctly and that WebSocket connections are allowed.' error.
If you've correctly configured the public URL for Testiny Server in SERVER_URL, please make sure that your proxy/firewall allows WebSocket connections.
We'd recommend to allow all /ws API routes, for example in an nginx config:
location ^~/api/v1/ws {
    proxy_pass http://<ADD_TESTINY_SERVER_IP:PORT_HERE>;

    [...]
}